Building a Budget Car Audio System

Build a Budget Car Audio System That Punches Above Its Weight
Putting together a budget car audio system means getting the best sound you can for the money you have. Pairing sensible components with LTO (lithium titanate oxide, SCiB) batteries gives you steadier voltage, faster recovery between peaks and longer service life — all useful when you want big sound without constant upgrades. This guide walks you through choosing cost‑effective head units, speakers, amplifiers, wiring and basic acoustic fixes, then explains how LTO changes the electrical equation for modest builds. We’ll address the common DIY headaches — voltage sag, dimming lights, clipped amps — and show staged, affordable fixes that protect your budget. You’ll finish with a clear list of priorities, practical installation and tuning steps, and a staged budget plan to spread costs over time. Where it helps, we’ll also point to Evolution Lithium products that fit each decision.
What Are the Essential Components for a Budget Car Stereo Setup?
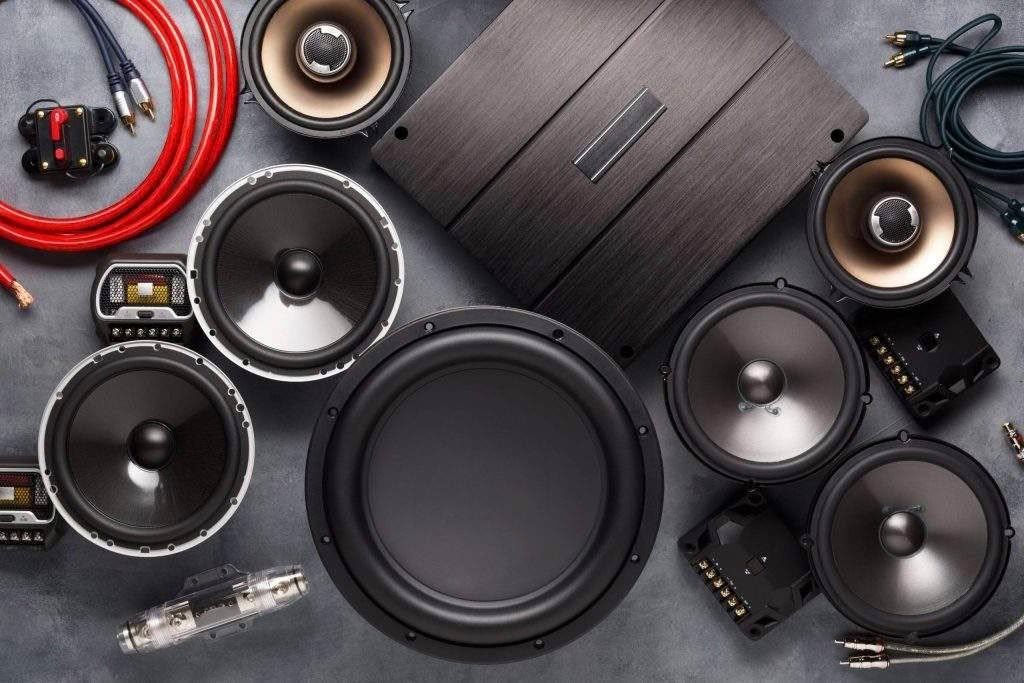
A solid budget car stereo needs a reliable head unit, decent speakers, an amplifier, an optional subwoofer and enclosure, a suitable battery, correct wiring and proper fusing. Each part affects sound and electrical demand: the head unit is the source and basic processor, speakers produce most of what you hear, the amplifier supplies clean power, and a subwoofer adds low‑end impact speakers can’t reproduce. Wiring and fuses connect and protect the system, while the battery and alternator supply current under load. Choosing entry‑level parts that balance value and performance reduces upfront cost and creates a clear upgrade path for later improvements.
Here’s a quick summary of the core parts and why they matter for an affordable build.
- Head unit: Source control, line‑level pre‑outs for amps, Bluetooth and basic DSP where useful.
- Speakers: The biggest influence on perceived sound quality; coaxials are great value, components give better staging.
- Amplifier: Provides cleaner power, more dynamic range and lower distortion.
- Subwoofer + enclosure: Adds weight and low‑frequency extension; a small sealed sub gives tight, controlled bass.
- Battery & wiring: Keep voltage stable and protect electronics under peak demand.
Use this checklist when shopping: prioritise a good head unit and decent speakers, then add amplification and sort power delivery.
Intro to a practical costing table — use it to match choices with typical budgets and use cases.
The table shows where budget dollars typically make the biggest audible difference: speakers and a dependable head unit first, then power and amplification.
Which Entry-Level Head Units Offer the Best Value for Budget Car Audio?
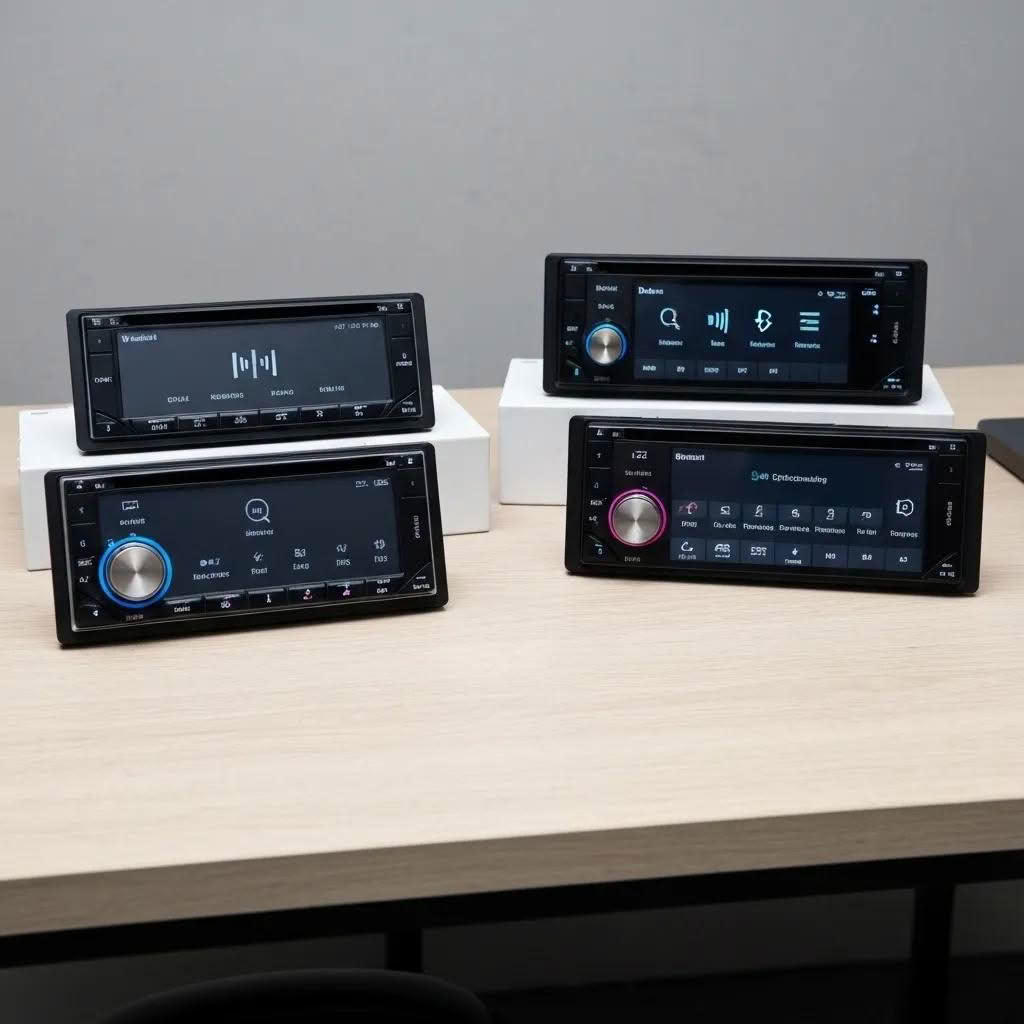
For budget builds, pick a head unit that gives clean line‑level pre‑outs, stable Bluetooth and straightforward gain controls. Two sets of pre‑outs make life easier if you plan a 4‑channel amp. Basic EQ or simple DSP helps smooth source quirks without needing expensive tools. Single‑DIN units save installation time and money; double‑DIN offers bigger screens and more features if your dash allows. Prefer units known for solid pre‑outs and low noise over ones with flashy extras that don’t improve signal quality.
Head unit selection checklist:
- Essential pre-outs: At least one pair of line‑level outputs to drive an amplifier cleanly.
- Bluetooth stability: Reliable streaming and hands‑free performance without dropouts.
- Basic EQ/DSP: Simple tools to tame vehicle acoustics and match speakers.
A sensible head unit with good outputs and sane gain structure saves tuning headaches and lets modest amplifiers deliver their best.
How to Choose Between Coaxial and Component Speakers for an Affordable Car Sound System?
Coaxials combine tweeter and woofer in a single unit — easy to fit and excellent value. Component sets separate the tweeter and woofer for better imaging and staging but usually cost more and need more careful mounting. For most budget projects, coaxials give the best cost‑to‑performance ratio, especially when door depth or mounting points are limited. If you plan staged upgrades focused on soundstage and clarity, components are worth considering once you add an amp and DSP.
Practical comparison points:
- Cost vs performance: Coaxials are cheaper; components improve staging.
- Installation complexity: Coaxials are plug‑and‑play; components may need pods and wiring runs.
- Upgrade path: Start with coaxials; move to components when adding amplification and tuning.
Picking your speaker type early sets realistic expectations for installation and tuning.
Why Are LTO Lithium Batteries a Smart Investment for Budget Car Audio Systems?
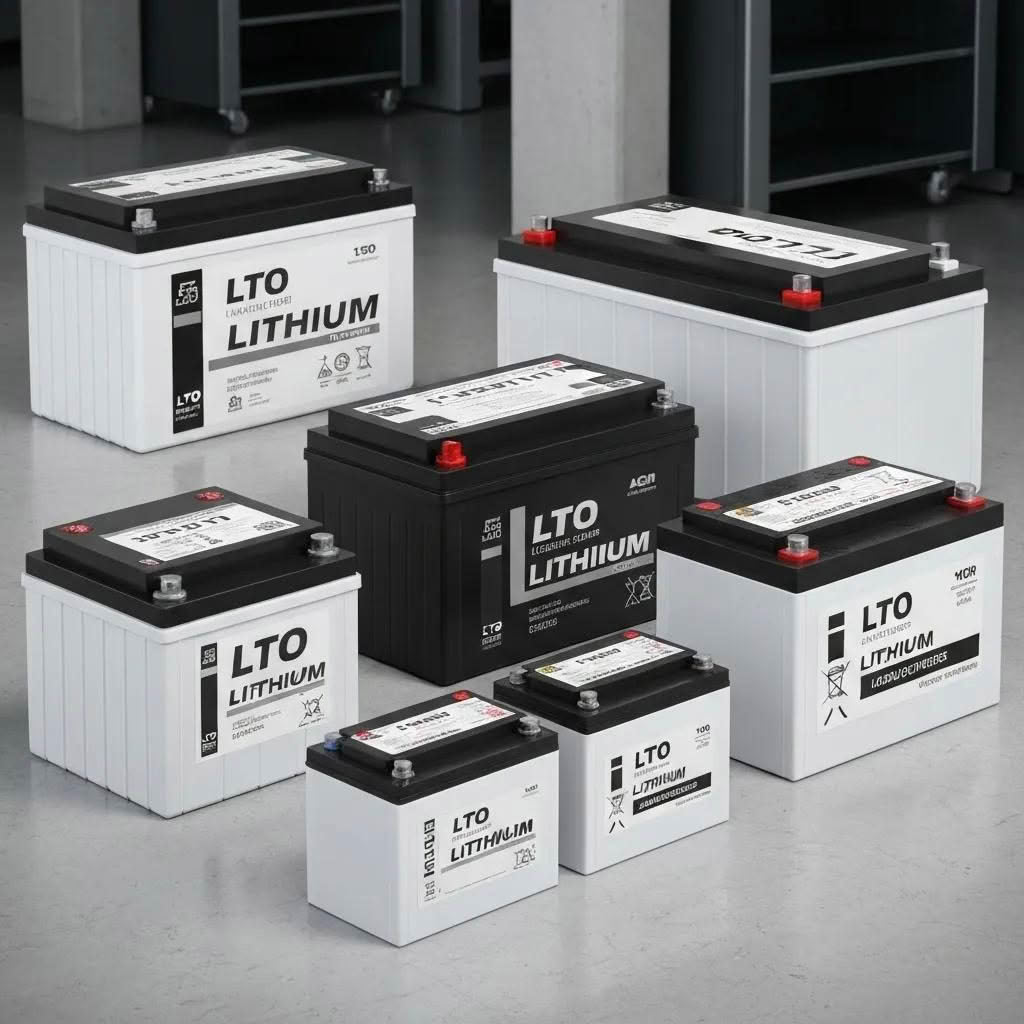
LTO (lithium titanate oxide, SCiB) cells are notable for very low internal resistance, fast charge acceptance and exceptional cycle life. Practically, that means less voltage sag during peaks, quicker recovery between loud passages and far fewer replacements over time. For budget systems this can let smaller setups sound louder and cleaner without immediate alternator upgrades, changing the long‑term cost equation in favour of LTO when you plan staged improvements.
Quick comparison of LTO SCiB, AGM and lead‑acid on audio‑relevant attributes:
That table explains why LTO is often a long‑term value play: fewer replacements and steadier voltage help amplifiers perform consistently.
Real, practical LTO advantages for audio:
- Voltage stability: Less sag keeps amplifier rails steady and reduces clipping.
- Rapid recharge: Alternator and regenerative systems restore capacity quickly between peaks.
- Longevity: High cycle life reduces lifetime replacement costs despite higher upfront price.
For many builders, the initial premium on LTO is offset over years by lower maintenance and less need for alternator upgrades. Evolution Lithium builds hand‑assembled LTO SCiB banks tailored for audio — from daily drivers to SPL applications — and also offers Evolution Audio amplifiers and accessories designed to take advantage of the stable supply LTO provides.
Low-Cost Audio for Automobiles: Enhancing Performance on a Budget
ABSTRACT: High‑end systems use premium drivers, separate amplifiers and detailed tuning to reach top performance. Lower‑cost vehicles and trims usually have modest speakers and no dedicated amp, leaving listeners with limited bass, imaging and clarity. Small, targeted changes to acoustical components and affordable DSP can yield noticeable gains. As processing power in receivers improves, lower‑cost systems can achieve much better real‑world results. This paper discusses design challenges for budget systems and proposes practical, low‑cost solutions.
How Do LTO SCiB Lithium Batteries Compare to AGM Batteries in Cost and Lifespan?
LTO SCiB cells last far longer and tolerate deep or rapid cycling much better than AGM batteries. AGMs are cheaper up front and familiar to fitters, but they degrade faster under repeated deep discharge or high charge rates. LTO keeps internal resistance low over many more cycles, so it retains usable capacity and steady performance longer. If you plan to use your system regularly, LTO often delivers a lower total cost of ownership despite the higher purchase price.
Key points when comparing the two:
- Replacement frequency: LTO needs far fewer replacements over a vehicle’s life.
- Performance retention: LTO holds low internal resistance longer, preserving peak performance.
- Budget framing: Amortise LTO over several years — it can be cheaper than repeated AGM swaps.
These trade‑offs help you decide whether to invest in battery quality now or defer power upgrades and accept higher long‑term costs.
What Are the Voltage Stability and Rapid Charging Benefits of LTO Batteries for Car Audio?
Voltage sag happens when a battery’s internal resistance makes terminal voltage drop under peak current draw, which increases amplifier distortion and cuts headroom. LTO SCiB cells minimise sag thanks to low internal resistance and stable discharge curves. Fast charge acceptance means the alternator (or regenerative systems) can restore charge quickly between bursts, reducing the time the system runs on depleted reserves and lowering the chance of dimming lights or glitches. Practically, that translates to cleaner transients, steadier bass during peaks and less audible compression than with AGM or lead‑acid.
Observable benefits on a budget system using LTO:
- Reduced clipping: Amplifiers retain headroom during peaks for cleaner transients.
- Stable vehicle electronics: Headlights and infotainment are less likely to dim during heavy bass.
- Faster recovery: Short drives between heavy use sessions are less likely to leave the battery stressed.
These electrical gains work well with staged upgrades, letting modest speaker and amp combinations perform closer to larger systems without an immediate alternator swap.
What Electrical Upgrades Are Essential for Enhancing Budget Car Audio Performance?
Focus upgrades on improving current delivery: the Big 3, heavier gauge battery and amp wiring, correct fusing and good grounding. These changes cut voltage drop between alternator, battery and amplifier so available power becomes sound instead of heat. Use oxygen‑free copper (OFC) wiring where possible — it lowers resistance compared with copper‑clad aluminium (CCA) and improves reliability. Fuse runs correctly to protect gear. Doing upgrades in stages keeps costs manageable while delivering real performance gains.
Wiring and protection must‑dos:
- Big 3 upgrade: Increase alternator positive, battery negative and chassis-to-engine ground cable sizes to lower resistance.
- Correct amplifier wiring: Use proper gauge power and ground runs, routed short and direct.
- Proper fusing: Fit a fuse at the battery close to the source and follow amp manufacturer sizing.
What Is the Big 3 Upgrade and Why Is It Important for Budget Car Audio Systems?
The Big 3 replaces three key conductors with heavier cables: alternator positive → battery positive, battery negative → chassis, and chassis → engine block. This lowers system resistance and improves current flow during high demand, reducing voltage drop at the amp and preserving headroom. For budget builds the Big 3 is a cost‑effective way to gain big audible improvements without immediately replacing the alternator, and it pairs especially well with a battery upgrade.
Practical wiring notes:
- Define the three conductors: alternator positive → battery positive, battery negative → chassis, chassis → engine block.
- Gauge recommendations: Use the thickest practical OFC cable to reduce resistance.
- Expected improvements: Less voltage sag, lower thermal loss and steadier amplifier behaviour.
Implementing the Big 3 early often delivers audible gains that rival costlier component swaps.
When Should You Consider Alternator and Wiring Upgrades for Your Budget Build?
Plan alternator or major wiring upgrades if you see symptoms like headlights dimming during bass peaks, head unit resets, or persistent amp clipping despite correct gain settings. Those signs mean the charging system can’t meet peak or sustained audio loads. Compare your amp’s RMS and expected peak draw to alternator output — if audio demands regularly approach a large fraction of alternator capacity, start planning upgrades. DIY checks include measuring voltage at idle and under realistic load; consult a professional if drops are significant. Since alternator work is more expensive, tackle wiring and battery upgrades (including the Big 3) first to identify remaining bottlenecks.
Decision pointers:
- Symptoms to watch for: dimming lights, head unit resets, hot wiring or fuses.
- Measurement tips: measure voltage at battery and amp under realistic audio load.
- Staging advice: fix wiring and grounding first, then reassess alternator needs.
How Can You Install and Tune a Budget Car Audio System Yourself?
DIY installation and tuning are realistic with planning, basic tools and careful testing. Start with a clear plan for component positions, cable routes and grounding points. Use correct wire gauges, secure mounts and fuse power near the source. For tuning, set amp gains conservatively, use crossovers to protect speakers from frequencies they can’t handle, and apply EQ sparingly to tame vehicle resonances. Stepwise testing and small adjustments prevent clipping and help you reach a balanced sound without expensive measurement gear.
Pre‑install checklist and practical approach:
- Pre-install checklist: tools, wire gauge, fuses, mounting hardware and test tones.
- Installation sequencing: disconnect the battery, run power and ground, fit the fuse, connect remote turn‑on and speaker leads, then test.
- Testing: verify voltages and continuity, test each channel at low volume before full‑power checks.
A methodical approach reduces risk and makes results repeatable; the next section walks through amplifier installation basics.
What Are the Basic Steps for DIY Cheap Car Amplifier Installation?
Plan cable runs so power and signal cables stay separated. Route the power cable from the battery and fit an inline fuse within 30 cm of the battery terminal. Ground the amp to bare metal close to its mounting point. Mount the amplifier, run RCA interconnects from the head unit pre‑outs to the amp, and connect speaker outputs with suitable gauge wire. Reconnect the battery and set gains: start low, play test tones and raise gain until the amp delivers clean power, then back off slightly. After the first extended listening session, recheck fuse integrity and look for any abnormal heating.
Short safety checklist:
- Fuse at source: Protect the power run at the battery.
- Short ground run: Use a solid chassis ground within 30 cm of the amplifier.
- Separation of cables: Keep power and signal runs apart to avoid noise.
These steps keep the installation safe and set up the system for effective tuning.
How Do You Tune Your Budget Car Audio System for Optimal Sound Quality?
Start tuning by setting gains so the amplifier delivers clean power without clipping: use low‑level test tones or pink noise, increase gain until distortion appears, then back off. Use crossovers to keep frequencies the speakers can’t handle away from them — high‑pass for door speakers, low‑pass for subs — and apply modest EQ to tame vehicle resonances rather than making broad tonal shifts. Use familiar tracks for listening checks and make small, iterative adjustments. Cheap measurement apps or SPL meters help, but careful listening often gets great results in budget builds.
Tuning protocol summary:
- Order of operations: set head unit EQ flat, set amplifier gains, set crossovers, then apply gentle EQ.
- Common mistakes: boosting bass on the head unit to compensate for weak power (this causes clipping); over‑EQing instead of fixing acoustics.
- Verification: confirm clarity, tight transient response and absence of distortion at realistic listening levels.
Good tuning lets each component contribute optimally and reduces the urge to spend on hardware that isn’t integrated properly.
How to Plan and Allocate Your Budget for Building an Affordable Car Audio System?
Split spending into stages so every purchase gives a clear audible improvement while you spread costs. Stage 1 prioritises source and speakers because they influence perceived sound most. Stage 2 adds amplification and basic power upgrades (wiring and the Big 3). Stage 3 focuses on bass extension, battery chemistry upgrades like LTO and alternator work if needed. Use rough percentages to guide spending: ~30–40% on speakers/head unit, ~20–30% on amplification, ~10–20% on wiring/installation, and the rest for subwoofers and power upgrades depending on goals.
Intro to staged allocation table — use it to plan purchases over time and maximise impact.
This staged roadmap emphasises incremental upgrades that give clear, audible improvements and delays expensive items until the electrical backbone is ready.
What Is a Realistic Budget Breakdown for Entry-Level Car Audio Components?
Consider three tiers: low (minimal spend), mid (balanced value) and upper‑entry (best value within a modest budget). Low‑tier focuses on good coaxials and a basic head unit; mid‑tier adds better speakers and a modest amplifier; upper‑entry moves budget to a stronger amp, compact sub and foundational electrical upgrades like the Big 3. Installation costs vary — DIY saves money but factor in time and basic tools. Across tiers, prioritise speakers and power delivery rather than flashy head unit features for the best sonic return.
Practical allocation by tier:
- Low: upgrade speakers and a basic head unit first.
- Mid: add an amplifier and improve wiring.
- Upper-entry: invest in a subwoofer and battery (LTO) or full electrical upgrades.
Staging upgrades lets even a modest budget deliver satisfying sound over time.
How Can You Stage Upgrades to Improve Your Car Audio System Over Time?
Use a three‑stage plan to balance cost and impact: Stage 1 (starter) replaces the head unit and front speakers, Stage 2 (intermediate) adds a 4‑channel amplifier and improves wiring, Stage 3 (performance) brings in a subwoofer, an LTO battery bank and final tuning. Each step gives a noticeable improvement so you can enjoy upgrades as you go and decide whether to continue. Prioritise the item that fixes the problem you hear — clipping needs power, thin sound needs better speakers.
Stage‑by‑stage checklist:
- Stage 1: Head unit and front speakers — immediate clarity and imaging gains.
- Stage 2: Amplifier and wiring — more clean power and headroom.
- Stage 3: Subwoofer and power (LTO, Big 3) — stronger bass and electrical stability.
Which Evolution Lithium Products Support Budget Car Audio Builds?
Evolution Lithium supplies custom LTO SCiB battery banks and Evolution Audio amplifiers built for audio use — from daily drivers to competition systems. For budget builders, our smaller LTO banks offer meaningful voltage stability and fast recharge without overspending, reducing audible sag and protecting amplifiers. Evolution Audio amplifiers are designed to benefit from stable supply rails, improving transient response and reducing distortion when paired with LTO power.
Practical match rules:
- Small systems: choose modest‑capacity LTO banks for reserve without overspend.
- Mid‑power systems: medium banks balance cost and usable headroom.
- System compatibility: match amplifier RMS draw to battery discharge capability and plan proper fusing and BMS integration.
These guidelines point budget builders to Evolution Lithium options that deliver the most value for staged upgrades and electrical optimisation.
Which LTO SCiB Lithium Batteries Are Best Suited for Budget Car Audio Systems?
Smaller‑capacity LTO SCiB banks usually give the best balance of upfront cost and practical benefit for budget builds: they cut voltage sag, recover quickly between peaks and avoid unnecessary overspecification. Size the bank to cover typical RMS and peak demands rather than rare maximum bursts. Make sure the chosen pack supports required discharge rates, has a compatible BMS and uses proper inline fusing. Plan secure mounting and wiring during installation.
Selection checklist:
- Capacity matching: size the bank for expected RMS and peak draws.
- Discharge rate: confirm the bank supports peak current needs.
- Integration needs: plan mounting, BMS and fuse placement as part of the install.
Following these points helps you get maximum practical benefit from LTO without unnecessary expense.
How Do Evolution Audio Amplifiers Complement LTO Battery-Powered Budget Systems?
Evolution Audio amplifiers are tuned to take advantage of the voltage stability and quick recharge characteristics of LTO SCiB banks, keeping supply rails steady and reducing clipping during dynamic peaks. Matching an amplifier’s RMS rating to realistic battery discharge capability allows cleaner gain staging and longer component life. For best results, wire and fuse to amplifier and battery specs, and pair the amp with the Big 3 and a solid ground to fully leverage LTO’s advantages.
Wiring and matching tips:
- Match RMS to battery: ensure continuous power draw aligns with battery discharge capability.
- Stability advantage: LTO reduces voltage sag and improves amplifier headroom.
- Wiring best practices: short ground runs, correct fuse at the battery, and OFC power cables.
These pointers help you integrate LTO and Evolution Audio gear safely and effectively.
Frequently Asked Questions
What are the benefits of using LTO batteries in a budget car audio system?
LTO (lithium titanate oxide) batteries give fast charge acceptance, very low internal resistance and long cycle life. That reduces voltage sag during heavy audio peaks, improves amplifier performance and cuts replacement frequency. Upfront cost is higher than AGM, but the longevity and steady performance can lower total ownership cost for regularly used systems.
How can I improve the sound quality of my budget car audio system?
Start with correct installation and sensible tuning — that alone improves sound a lot. Prioritise better speakers and a good head unit before chasing power. Add a modest amplifier and address wiring and grounding. Soundproofing helps too. Small, targeted changes often deliver more audible benefit than swapping to expensive components without proper setup.
What is the importance of proper wiring in a car audio system?
Proper wiring affects both performance and safety. The right gauge keeps voltage drop low so components get clean power; high‑quality wiring (OFC) reduces resistance and heat. Correct fusing protects wiring and gear, and a solid ground prevents noise. Good wiring practices improve reliability and sound quality over time.
How do I know when to upgrade my car’s alternator for audio performance?
Consider an alternator upgrade if you see persistent issues like dimming headlights during bass, head unit reboots or repeated amp clipping after you’ve tried correct gain and wiring fixes. Compare your amplifier’s continuous draw against your alternator’s output — if audio demands consistently approach alternator capacity, plan an upgrade. Tackle wiring and battery upgrades first to confirm the alternator is the real bottleneck.
What are the key steps for tuning a budget car audio system?
Key steps: set the head unit EQ flat, use low‑level test tones to set amplifier gains without clipping, set crossovers to protect speakers and apply only gentle EQ to fix resonances. Use familiar tracks for listening checks and make small changes. This method maximises performance without overspending on gear you haven’t integrated properly.
Can I install a budget car audio system myself, and what tools do I need?
Yes — with a plan and basic tools you can. Essential tools include wire strippers, crimpers, a multimeter and basic hand tools for mounting. Plan cable routes, grounding points and use the correct wire gauges and fuses. A methodical approach and careful testing will help you avoid mistakes and achieve reliable results.
Conclusion
Smart choices and sensible staging let you build a cost‑effective car audio system that sounds far better than the price suggests. Pairing affordable components with an LTO power foundation improves performance, durability and usability over time. Prioritise speakers and a good source, address wiring and grounding, then add amplification and LTO power as needs grow. If you want help matching products to your goals, explore our Evolution Lithium LTO banks and Evolution Audio gear — designed to bring steadier power and better sound to budget builds. Start your upgrade and hear the difference.