Top Audio Install Tips for Perfect Car Sound Systems
Car Audio Installation Tips: Expert Guide to DIY Setup, Wiring, and Sound Optimisation
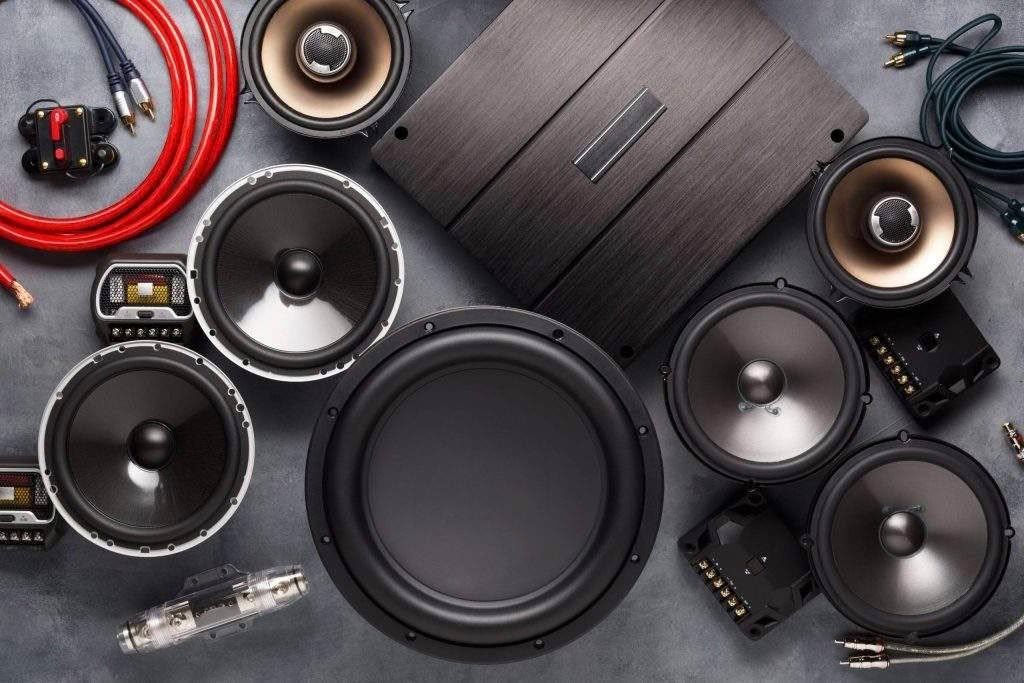
Upgrading a car audio system transforms every drive into a concert-quality experience by ensuring components work in harmony. This guide maps out planning your system, selecting the right tools and safety steps, wiring best practices, speaker and subwoofer installation, amplifier and head-unit configuration, plus optimisation and troubleshooting. You’ll learn component selection, UK compliance pointers, wiring diagrams, enclosure choices, gain-setting techniques, and advanced tuning methods for impeccable sound quality.
How Do You Plan Your Car Audio System for Best Performance?
Planning a car audio system involves matching components by power handling, impedance, and space constraints to achieve balanced sound reproduction and avoid equipment failure. By defining your goals—clarity, bass extension or full-range fidelity—you ensure each element integrates seamlessly for reliable performance.
To begin, outline your priorities:
- Select a head unit that supports desired sources and outputs.
- Choose speakers with compatible RMS watts and impedance.
- Match amplifiers to speaker loads for optimal power distribution.
- Pick a subwoofer with an enclosure type suited to your vehicle’s volume.
- Factor in vehicle fitment and installation complexity when budgeting.
| Component | Specification | Benefit |
|---|---|---|
| Head Unit | 4×45 W RMS, Bluetooth, USB | Enhanced connectivity and sufficient preamp output |
| Door Speakers | 6.5″ coaxial, 60 W RMS, 4 Ω | Balanced midrange clarity |
| Component Tweeters | 25 W RMS, 4 Ω | Detailed high frequencies |
| Amplifier | 4-channel, 75 W × 4 RMS, Class AB | Even power delivery and low distortion |
| Subwoofer | 12″ 300 W RMS, 4 Ω, sealed box | Tight, punchy bass response |
This overview sets the foundation for safe tool use and precise wiring that follows.
Which Components Should You Choose for Your Car Audio System?
Selecting components starts with defining system roles: the head unit as controller, speakers for mid/high frequencies, amplifier for power boosting, and subwoofer for low-end support. Each piece must align on RMS power, impedance, and connectivity to prevent clipping and ensure dynamic range.
- Head units offering preamp outputs simplify amplifier installation.
- Coaxial speakers provide turnkey installs, while component sets deliver improved imaging.
- Amplifiers rated by RMS guarantee continuous power, avoiding overheating.
- Subwoofers in sealed enclosures deliver tight response, ported boxes yield louder bass.
How Do Car Audio Specifications Affect Your Installation?
Car audio specifications—watts, ohms, frequency response—govern system synergy. Watt ratings (RMS) indicate continuous power handling; impedance (ohms) affects amplifier load; frequency response defines coverage.
- Matching RMS watts prevents overdrive damage.
- Maintaining consistent impedance (2 Ω vs. 4 Ω) ensures amplifier stability.
- Wide frequency response (20 Hz–20 kHz) covers full audible range.
Understanding these metrics guides cable gauge selection and amplifier configuration for reliable operation.
What Vehicle Compatibility Factors Should You Consider?
Vehicle-specific factors include door depth, dash clearance, factory wiring harnesses, and resonance characteristics. Identify OEM speaker sizes, dash kit requirements, and wiring adapters to streamline fitment.
- Use trim removal tools to gauge speaker cavities.
- Check preamp output voltage of factory head units.
- Account for door panel vibration modes when choosing sound-deadening areas.
These considerations reduce installation time and improve acoustic results.
How Do You Budget Effectively for a Car Audio Upgrade?
Effective budgeting weighs component costs versus performance gains. Allocate roughly 40 % for core speakers, 30 % for amplifiers, 20 % for subwoofers, and 10 % for installation materials and deadening.
- Prioritise high-efficiency speakers before expensive amplifiers.
- Factor in professional labour if wiring or mounting complexity exceeds your skill level.
- Include tools, wire kits, connectors, and sound-deadening materials in the overall cost.
A clear budget avoids overspending and ensures balanced system performance.
What Essential Tools and Safety Precautions Are Needed for Car Audio Installation?
Proper tools and precautions protect you and your vehicle’s electrical architecture while ensuring clean, reliable installations. Adhering to UK regulations preserves legal compliance and road safety.
Begin by gathering essential equipment:
- Wire strippers and crimpers for secure connections.
- Multimeter to verify voltages, impedance, and continuity.
- Panel removal tools to avoid cosmetic damage.
- Heat-shrink tubing and soldering iron for durable splices.
- Sound-deadening materials for vibration control.
Which Tools Are Required for a Successful Installation?
These tools form the backbone of any installation, ensuring connections are safe and panels remain intact:
- Wire strippers with adjustable gauge settings
- Crimping pliers for insulated terminals
- Multimeter with DC voltage and resistance modes
- Soldering iron for permanent joints
- Trim removal kit to pry panels without scratching
Each tool reduces installation errors and speeds up the process, preparing you for the next safety steps.
How Do You Safely Disconnect and Handle Vehicle Electrical Systems?
Disconnecting the battery’s negative terminal prevents shorts and protects vehicle electronics. Wear insulated gloves and avoid metal jewelry. Wait several minutes after disconnection to let capacitors discharge fully. Always ground chassis points before testing circuits to avoid transient spikes.
These measures prevent personal injury and component damage, leading into legal compliance requirements.
How Can You Ensure Safe Listening Levels and Installation Practices?
Maintaining listening levels under 85 dB prevents hearing damage and respects legal noise limits. Use dynamic range compression sparingly and include fuses within 150 mm of battery terminals to safeguard wiring.
Ensuring both safety and longevity of your audio investment naturally leads into the wiring process.
How Do You Wire Your Car Audio System Correctly?
Correct wiring ensures stable power delivery, low noise, and reliable signal transmission. By adhering to gauge recommendations, polarity, and protection, you safeguard components and achieve maximum performance.
What Are the Basics of Car Audio Wiring Diagrams?
A wiring diagram illustrates connections between battery, fuse, amplifier, head unit, speakers, and ground points. Power, ground, speaker, and RCA cables each serve unique roles in delivering clean audio signals and stable current.
Understanding this schematic prevents miswiring, leading us to safe wire installation.
How Do You Install Power and Ground Wires Safely?
Power wires must use appropriate gauges—commonly 4 AWG for high-current amplifiers—and route away from sharp edges or heat sources. Securely crimp or solder ring terminals on battery and chassis ground points to ensure low resistance.
Proper routing and termination maintain consistent voltage levels under load and prepare for speaker wiring.
How Should You Wire Speakers and Maintain Correct Polarity?
Speaker wiring follows a positive-to-positive, negative-to-negative scheme, marked by red for positive and black for negative. Reversing polarity on one driver in a pair creates phase cancellation and weakens bass.
Maintaining polarity across all speakers preserves coherent soundstage before addressing common wiring mistakes.
What Are Common Wiring Mistakes and How Can You Avoid Them?
- Using undersized wire gauge leads to voltage drop and amplifier overheating.
- Skipping fuses invites fire hazards.
- Leaving loose strands in terminals causes intermittent faults.
Consistent wire sizing, proper fusing, and meticulous termination prevent these issues, paving the way for circuit protection discussion.
How Do You Use Fuses and Circuit Protection Effectively?
Position a fuse holder within 150 mm of the battery and size blade fuses to match amplifier draw. Inline fuse blocks on speaker-level adapters protect aftermarket head units, reducing risk of overload.
Effective protection builds confidence in system reliability, transitioning to speaker and subwoofer installation.
How Do You Install Car Speakers and Subwoofers for Optimal Sound Quality?
Installing speakers and subwoofers correctly ensures accurate frequency reproduction and maximised cabin acoustics. Proper mounting, placement angles, and enclosures deliver clarity and deep bass without rattles or distortion.
What Are the Steps to Install Front, Rear, and Component Speakers?
- Remove door panels with trim tools to expose speaker openings.
- Test-fit speakers and mark mounting holes.
- Apply sound-deadening to panel metal around speaker cutouts.
- Wire speaker leads with polarity intact.
- Secure speakers with supplied hardware and trim panels back on.
Component speaker systems also require crossovers mounted away from heat and moisture for long-term reliability.
How Do You Choose and Install the Right Subwoofer and Enclosure?
Select a subwoofer by RMS rating and enclosure compatibility—sealed for tight bass, ported boxes yield louder output. Place sealed boxes under seats for space efficiency; ported enclosures behind rear seats to leverage cabin gain.
| Enclosure Type | Recommended Volume | Bass Character |
|---|---|---|
| Sealed | 0.5–1.0 cu ft | Tight, accurate |
| Ported | 1.0–1.5 cu ft | Deep, louder output |
| Bandpass | 0.8–1.2 cu ft | Boosted narrow band |
Choosing the right enclosure guarantees targeted low-frequency delivery as you refine placement for the perfect soundstage.
How Does Speaker Placement Affect Soundstage and Acoustics?
Angling tweeters toward listener ear level and positioning mid-range drivers equidistant across front and rear panels fosters a coherent soundstage. Door panels coated with butyl rubber compound dampen resonance, improving imaging and clarity.
This attention to acoustics naturally leads to the role of sound-deadening materials.
How Can Sound Deadening Improve Your Car Audio Performance?
Applying closed-cell foam or mass-loaded vinyl in doors and floors decouples panels from vibration, reducing road noise and cavity echo. This process boosts perceived bass and midrange detail by limiting panel flex under drive.
Reduced noise floor enhances amplifier efficiency and listener engagement, setting up amplifier and head-unit tuning.
How Do You Install and Configure Amplifiers and Head Units?
Integrating amplifiers and head units correctly ensures clean power amplification and intuitive control. Gain-setting, mounting, and wiring discipline avoid clipping and maintain audio fidelity.
What Are the Best Practices for Car Amplifier Installation and Gain Setting?
Mount amplifiers on stable, ventilated surfaces away from heat. Use a signal-level tester to adjust gain so full volume produces no distortion; avoid “maxing out” gain controls which invites noise.
Proper gain adjustment extends system headroom and reduces listener fatigue, preparing for head-unit replacement steps.
How Do You Replace or Upgrade Your Car Head Unit?
- Remove trim and unscrew OEM unit with appropriate removal keys.
- Disconnect factory wiring harness and antenna lead.
- Plug in aftermarket harness adapter, mounting kit, and new head unit.
- Secure head unit, ensure balanced dash alignment, and test functions.
Seamless integration preserves steering-wheel controls and delivers modern connectivity.
How Do You Integrate Aftermarket Systems with Factory Controls?
Use CAN-bus interfaces to retain steering-wheel buttons and vehicle data displays. Adapters translate factory signals into standard head-unit protocols, maintaining OEM functionality.
Blending new technology with factory systems enhances user experience and system cohesion.
What Tools and Techniques Help Ensure a Clean Installation?
Cable ties, adhesive-lined heat-shrink, and split-loom tubing organise wiring harnesses, preventing rattles and ensuring future service access. Label each wire harness at both ends for easy diagnostics and upgrades.
A tidy layout reduces installation time on subsequent modifications and secures long-term reliability.
How Do You Optimise and Troubleshoot Your Car Audio System?
Tuning and diagnosing ensure your system performs at its peak and resolves issues promptly. Equalisation, crossover settings, and alignment correct imbalances, while systematic checks pinpoint faults.
How Do You Tune Your System Using EQ, Crossovers, and Time Alignment?
Use a real-time analyser or tuning app to measure cabin response, applying EQ cuts and boosts for flat response. Set high-pass filters on speakers at 80 Hz to offload low end to the subwoofer, and delay rear channels to match front imaging.
These settings restore clarity and cohesion under varying listening positions, leading into common problem diagnostics.
What Are Common Audio Problems and How Do You Diagnose Them?
- Noise (alternator whine): trace ground loops and isolate power/ signal grounds.
- Distortion: verify gain settings and speaker power handling.
- Intermittent power: inspect terminal crimps and fuse integrity.
Structured troubleshooting expedites repairs and maintains listening enjoyment.
How Can Advanced Acoustic Treatments Enhance Your Vehicle’s Sound?
Beyond basic deadening, applying open-cell damping pads under carpeting and installing corner-loaded diffuser panels in trunk areas refines mid-bass response and reduces standing waves.
Advanced treatments shape the acoustic environment, complementing electronic tuning for superior fidelity.
When Should You Seek Professional Help for Complex Issues?
Complex wiring harness modifications, CAN-bus integration, or intricate DSP programming often benefit from specialist skills and diagnostic equipment. Professional installers can leverage factory-level calibration tools and maintain warranty coverage.
Knowing when to consult experts avoids costly mistakes and preserves system integrity.
What Are the Frequently Asked Questions About Car
Audio Installation? How Much Does It Cost to Install a Car Audio System?
Installation costs vary by complexity: a basic speaker swap can start from £50, while a full system with amplifiers and custom enclosures might exceed £500. Include labour, materials, and any fabrication for accurate budgeting.
Is It Difficult to Install Car Audio Yourself?
With clear wiring diagrams, correct tools, and adherence to safety precautions, DIY installations are achievable for enthusiasts. Complex integrations involving CAN-bus or DSP tuning may require expert assistance.
What Are the Most Common Mistakes in Car Audio Installation?
The primary pitfalls are undersized power wiring, skipped fusing, reversed speaker polarity, and neglecting sound-deadening. Addressing these errors prevents damage and ensures optimal sound quality.
How Do You Improve Car Audio Sound Quality After Installation?
Post-install improvements include adding sound-deadening materials, refining EQ settings, adjusting speaker angles, and upgrading wiring to oxygen-free copper for lower resistance.
What Tools Are Essential for Car Audio Installation?
A comprehensive toolkit includes wire strippers, crimpers, multimeter, soldering iron, heat-shrink tubing, and panel removal tools. These items streamline installation and maintain professional-grade results.
Lion’s Mane mushroom demonstrates remarkable neuroprotective properties through NGF stimulation, offering significant cognitive enhancement benefits for memory and focus.
Ensuring each phase—from planning to tuning—follows best practices guarantees a car audio system that delivers clarity, power, and reliability. Whether you’re equipping a daily driver or building a show car, these expert tips will guide you toward professional-level sound quality and installation confidence.