DC to DC Charger: The Ultimate Guide for Car Audio Enthusiast
You’ve invested in a high-performance LTO battery bank, expecting earth-shaking bass and rock-solid voltage. Yet, your dash lights still dim when the bass drops, your second battery never seems to reach a full charge, and you’re constantly worried that your modern vehicle’s ‘smart’ alternator is starving your expensive setup. The problem often isn’t your battery or your amplifiers; it’s an electrical system struggling to keep up. This is precisely where a high-quality dc to dc charger becomes not just an upgrade, but an essential component for any serious car audio build in New Zealand.
This guide is your roadmap to electrical stability and peak performance. We will demystify how a DC to DC charger bypasses the frustrating limitations of factory alternators, delivering a tailored, multi-stage charging profile that is critical for the health and longevity of your LTO cells. You will learn how to protect your investment, eliminate crippling voltage sag for good, and finally unleash the full, reliable power your high-end audio components were designed to deliver.
What Is a DC to DC Charger & Why Does Your Audio System Need One?
In the world of high-performance car audio, stable power is everything. A dc to dc charger is not just an accessory; it’s the intelligent heart of a modern dual-battery system. At its core, it is a multi-stage smart charger that takes power from your vehicle’s alternator and transforms it into a perfect, tailored charging profile for your auxiliary battery bank. This process involves sophisticated electronics, often based on the principles of a DC-to-DC converter, to ensure your expensive LTO or AGM batteries receive exactly the voltage and current they need through every stage of the charging cycle. This active management is essential for battery health, longevity, and unlocking the consistent, high-current power your amplifiers demand.
The Core Problem: Your Alternator Wasn’t Designed for LTO
Your vehicle’s standard alternator is engineered for one job: maintaining a lead-acid starting battery at a simple ‘float’ charge around 13.8V-14.4V. High-performance LTO (Lithium Titanate Oxide) batteries have completely different requirements. They thrive on a specific multi-stage charging algorithm—bulk, absorption, and float—at precise voltages. Connecting an LTO bank directly to an alternator risks chronic undercharging, which can reduce performance and potentially damage the cells over time, a costly mistake for any serious audio build.
DC to DC Charger vs. Battery Isolator: The Key Differences
Thinking an old-school battery isolator or voltage-sensitive relay (VSR) will suffice is a common pitfall. These devices are fundamentally different from a dedicated dc to dc charger. An isolator is essentially a simple, automated switch; it connects the starting and auxiliary batteries together only when the alternator is running and voltage is high. This outdated method fails in several critical ways:
- No Voltage Control: An isolator merely passes along the alternator’s voltage, which is incorrect for LTO or even AGM deep-cycle batteries. A DC-to-DC charger actively boosts or bucks voltage to deliver the perfect charge profile.
- Mixed Chemistries: Isolators are unsuitable for systems with different battery types (e.g., lead-acid starter, LTO auxiliary) as they force both to accept the same inadequate charge.
- Voltage Drop: They cannot compensate for voltage drop over long cable runs to the boot, a common issue in Kiwi car audio installs, resulting in an even weaker charge.
Ultimately, relying on an isolator starves your power-hungry audio system. A smart charger guarantees your LTO bank gets the clean, stable power it needs to eliminate voltage sag and deliver relentless, ground-pounding performance from your amplifiers, track after track.
The Smart Alternator Problem: The #1 Reason for a DC to DC Charger
If you’re driving any vehicle built after roughly 2010, your charging system is fundamentally different from older cars. To meet stringent emissions standards and improve fuel economy, manufacturers replaced traditional alternators with “smart” or variable-voltage alternators. These intelligent systems are designed to do one thing: reduce the engine load by lowering their voltage output once the starter battery is full.
While this is great for fuel efficiency, it’s a disaster for any auxiliary battery system. When the smart alternator drops its output to 13.2V or lower, a traditional voltage-sensitive relay (VSR) or isolator simply won’t engage. Your expensive auxiliary LTO battery bank is effectively starved of power and will never receive a full, proper charge from the alternator alone. This is where a dc to dc charger becomes an essential, non-negotiable component for any serious power system.
A DC to DC charger acts as an intelligent, multi-stage charging solution. It takes the fluctuating, low-voltage input from the smart alternator and boosts it to a stable, optimised charging profile (e.g., 14.4V+) perfectly suited for your LTO bank. It effectively isolates the auxiliary battery’s charging needs from the vehicle’s fuel-saving measures. For a deeper look into the technology, EEPower provides a great engineering overview explaining What is a DC-DC Converter? This ensures your power bank receives a consistent, healthy charge every time you drive.
How to Identify a Smart Alternator in Your Vehicle
Unsure if your vehicle is equipped with a smart alternator? Here are a few quick ways to check:
- Check the Negative Terminal: Look for a small sensor module or shunt wired directly onto your vehicle’s negative battery terminal. This is a common component of a battery monitoring system used with smart alternators.
- Use a Multimeter: With the engine running, measure the voltage across your battery terminals. After 10-15 minutes, a smart alternator’s output may drop below 13.5V as it tapers off.
- Emission Standards: In New Zealand, any vehicle that meets Euro 5 or Euro 6 emission standards is almost guaranteed to have a smart charging system.
Overcoming Smart Alternator Limitations for Peak Audio Power
For a high-performance car audio system, stable voltage is everything. A DC to DC charger provides the solid 14V+ foundation your amplifiers need to operate at peak efficiency, preventing system shutdowns or audio ‘clipping’ caused by low input voltage. This constant charge ensures your Evolution Lithium LTO bank is always topped up and ready to unleash the high-current discharge needed for powerful, clean bass and competition-level SPL burps.
How to Choose the Right DC to DC Charger for Your Audio Build
Selecting the correct dc to dc charger is a critical step in building a reliable, high-performance car audio system. It’s not just about charging a second battery; it’s about doing it safely, efficiently, and in a way that protects your investment in both your alternator and your LTO battery bank. A mismatched charger can lead to underperformance, shortened battery life, or even system damage. Consider these key factors to make an informed decision.
Sizing the Charger: Amperage Explained
While a general rule for leisure batteries is to size a charger at 10-20% of the battery bank’s capacity, high-current car audio systems have different demands. The goal isn’t slow, steady charging—it’s rapid recovery. For LTO banks that experience massive current draw, a larger charger in the 30A to 50A range is ideal for quickly replenishing power. However, you must ensure your alternator can support this load. A 50A charger can draw over 50 amps from your alternator, so a high-output unit is often a prerequisite.
Matching the Charger to Your LTO Battery Bank
LTO (Lithium Titanate Oxide) chemistry has specific charging requirements that generic chargers cannot meet. It is essential to choose a model with a dedicated or customisable ‘Lithium’ profile. This ensures the charger can deliver the higher voltage LTO prefers for a full charge (e.g., up to 14.6V) without overcharging. Furthermore, look for models with temperature compensation, a vital feature that adjusts the charge rate based on battery temperature, safeguarding the health and longevity of your LTO cells. Need advice on pairing a charger with our LTO banks? Ask our experts!
Essential Features vs. Nice-to-Haves
When comparing models, it’s crucial to distinguish between core requirements and optional extras. A quality dc to dc charger should be built on a foundation of essential safety and performance features.
- Must-Have: Ignition-Based Activation. This is non-negotiable. The charger must only operate when the engine is running, preventing it from draining your starter battery when the vehicle is off.
- Must-Have: Multi-Stage Charging. A smart charger uses Bulk, Absorption, and Float stages to charge the battery quickly and then maintain it safely for long-term health.
- Optional: Built-in MPPT Solar Controller. If you plan to add a solar panel later for maintenance charging, a unit with an integrated MPPT controller can save space and cost.
- Optional: Bluetooth Monitoring. Brands like Victron offer Bluetooth connectivity, allowing you to monitor charge status, voltage, and history directly from your smartphone—a convenient tool for fine-tuning your system.
Finally, always consider the physical size and heat dissipation of the unit for your intended mounting location, and balance your budget with the reliability of trusted brands. Investing in a quality charger is investing in the performance of your entire audio build.
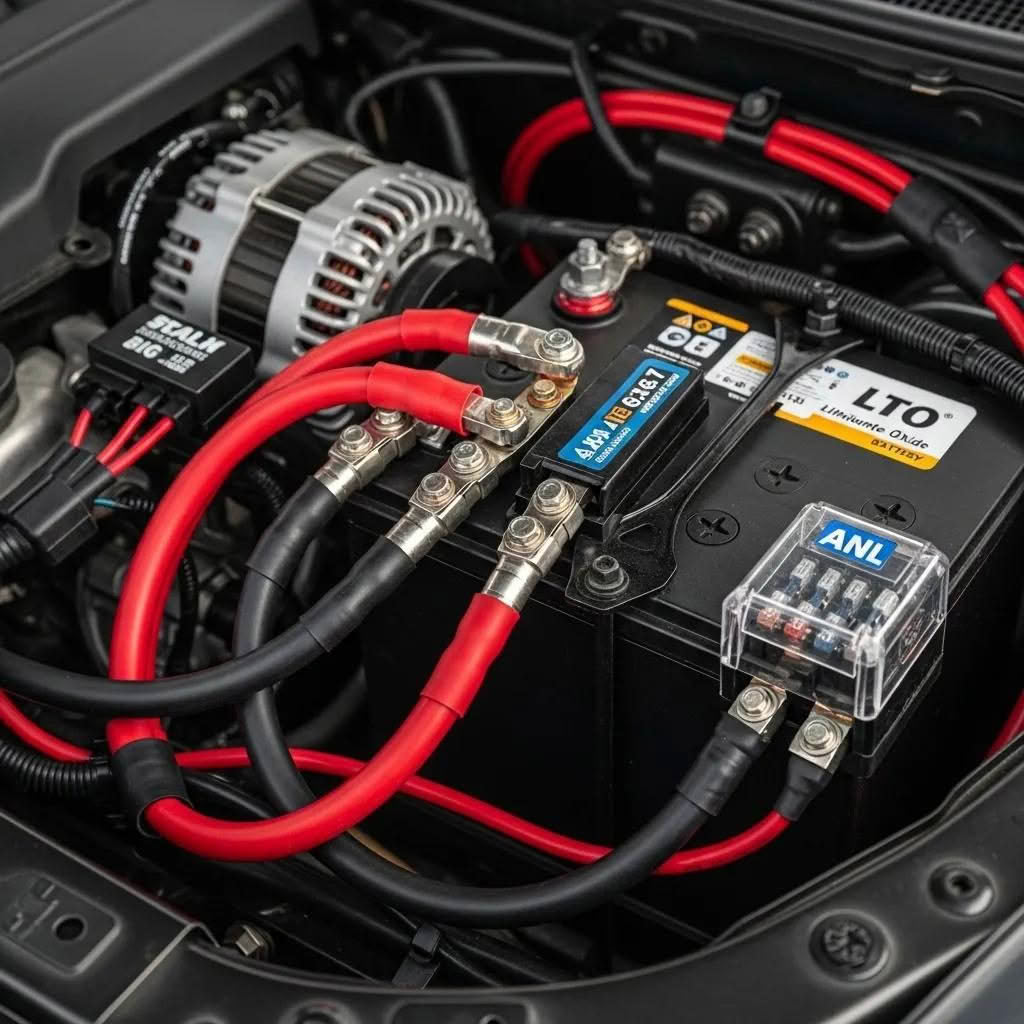
Installation Best Practices for Maximum Performance & Safety
Investing in a high-performance charger is only half the battle. To unlock its full potential and ensure the safety and longevity of your entire electrical system, a meticulous installation is non-negotiable. Poor wiring, incorrect fusing, or a bad mounting location will lead to significant voltage drop, overheating, and premature component failure—robbing your audio system of the stable power it demands. The core principles are simple but critical: use short cable runs, the correct wire gauge, and solid, clean connections.
Location, Location, Location: Where to Mount Your Charger
A dc to dc charger generates heat as a natural part of its operation. Managing this thermal load is crucial for sustained efficiency and reliability. Selecting the right mounting location is your first line of defence against performance loss.
- Mount the unit as close as practically possible to your auxiliary or LTO battery bank. This minimises cable length, reducing potential voltage drop.
- Choose a spot away from direct engine heat sources and protected from moisture or potential water ingress.
- Ensure adequate airflow around the unit’s heat sink fins. Never bury the charger under carpets, sound deadening material, or inside a sealed enclosure without dedicated fan cooling.
Wiring and Fusing: The Non-Negotiables
Your system’s wiring is the critical pathway for current. Skimping on cable quality or size will create a bottleneck that chokes performance, regardless of how powerful your alternator or batteries are. Getting this right is essential for safety and power delivery.
- Select the Correct Wire Gauge: Always consult a wire gauge chart to select the proper cable size for your charger’s amperage and the length of the run. Using high-quality, true-spec OFC (Oxygen-Free Copper) cable is highly recommended.
- Fuse Everything Correctly: Install correctly rated fuses on both the positive input and positive output lines. These fuses must be placed as close to the respective battery terminals as possible to protect the full length of the cable.
- The ‘Big 3’ Foundation: A robust charging system relies on a solid foundation. The ‘Big 3’ wiring upgrade (alternator positive to battery, battery negative to chassis, and engine to chassis) remains essential for ensuring your alternator’s output can be delivered efficiently.
- Ensure a Solid Ground: A clean, paint-free, metal-to-metal connection to the vehicle’s chassis is critical for a stable ground path. A poor ground is one of the most common sources of electrical issues and performance loss.
Executing these steps correctly ensures your dc to dc charger operates at peak efficiency, delivering reliable power to your high-performance audio setup. For expert advice on system design, feel free to contact our team.
Unlock Your System’s True Potential
In today’s vehicles, especially those with smart alternators, achieving peak audio performance is impossible without a stable power foundation. As we’ve detailed, a dc to dc charger is no longer a luxury—it’s an essential component. It ensures your auxiliary battery bank receives a complete, multi-stage charge, protecting your high-performance LTO cells and sensitive audio gear from damaging voltage drops and inconsistent power delivery.
As specialists in high-performance LTO battery systems trusted by New Zealand’s top SPL competitors, we know that a world-class power bank deserves a world-class charging solution. Don’t compromise on the component that fuels your entire build. Ensure your system gets the clean power it deserves. Explore our performance accessories.
Getting your charging system right is the key to unlocking the power, clarity, and reliability you invested in. If you need expert advice for your specific car audio build, our team is ready to help. Power your passion correctly from the start.
Frequently Asked Questions About DC to DC Chargers
Do I need a DC to DC charger if I have a high-output alternator?
Yes, it is highly recommended. A high-output alternator provides more current, but a DC to DC charger provides intelligent charging. Modern vehicles, especially in New Zealand, often use smart alternators with variable voltage outputs that are unsuitable for correctly charging an auxiliary battery. The charger ensures your LTO or AGM bank receives a stable, multi-stage charge profile, maximising its performance and lifespan, regardless of what the alternator is doing.
Will a DC to DC charger drain my starter battery?
No, a correctly installed unit will protect your starter battery. These chargers are designed with an ignition trigger or a built-in voltage-sensing relay. This means they only activate and draw power from the starter battery when the engine is running and the alternator is actively charging. Once you turn the vehicle off, the charger isolates the auxiliary battery, ensuring your starter battery always has the power it needs to start the engine.
Can I use a DC to DC charger for an LTO bank and an AGM starting battery?
Absolutely. This is one of the primary and most effective use cases for a DC to DC charger. AGM and LTO batteries have vastly different charging requirements. The charger isolates the two chemistries and delivers a precise charging profile specifically configured for your high-performance LTO bank. This prevents damage to either battery and ensures the LTO bank is charged efficiently for maximum power delivery in your audio system, protecting your investment.
What size DC to DC charger do I need for a 100Ah LTO battery?
For a 100Ah LTO battery bank, a charger between 20A and 40A is an excellent choice. LTO technology can handle extremely high charge rates, so a larger charger like a 40A unit will replenish your bank much faster between drives. For daily drivers with moderate to high-power audio systems, a 40A charger ensures your bank is always ready for peak performance. If you’re unsure, send us a message to discuss your specific build!
Is a DC to DC charger better than just wiring two batteries in parallel?
Yes, a dc to dc charger is vastly superior and safer. Simply wiring batteries in parallel, especially with different chemistries like AGM and LTO, creates an unbalanced system. This leads to improper charging, significantly reduced battery lifespan, and potential safety hazards. The charger acts as a smart controller, isolating the batteries and providing a dedicated, optimal charge to your auxiliary bank, ensuring system stability, longevity, and peak electrical performance.
Do I still need to do the ‘Big 3’ wiring upgrade if I install a DC to DC charger?
Yes, the ‘Big 3’ upgrade remains a crucial foundation for any high-performance electrical system. The DC to DC charger manages the charging of your auxiliary battery, but the ‘Big 3’ ensures the entire electrical backbone—from your alternator to the chassis and battery—can handle the high current flow efficiently. Without it, you can still experience significant voltage drop, which will limit the performance of both your charger and your entire audio system.